Dev Journal #12 - AndroidX Navigation
androidNavigation
One of my favourite Android Jetpack libraries is the Navigation framework. Before the introduction of this library, you’d typically use intents or fragment transactions to switch between activities and fragments. With the new navigation component, you have a centralized place to define all the possible navigation paths between fragments and activities. It also takes care of backstack and type-safe argument passing (with gradle plugin). I’m mindblown to see how much the support library has progressed in the last couple of years 🤯
Dependencies
You will need the following dependencies included in your project to use the Navigation component.
// Project dependency

dependencies {
    classpath "androidx.navigation:navigation-safe-args-gradle-plugin:2.3.4"
}
// Module dependency

dependencies {
    implementation "androidx.navigation:navigation-fragment-ktx:2.3.4"
    implementation "androidx.navigation:navigation-ui-ktx:2.3.4"
}
Single Activity Architecture
I would highly encourage you to watch this talk given by Ian Lake: Single activity: Why, when and how
Why do we even have activities? They’re useful as an entry point but beyond that, you’re in your realm.
- Ian Lake, Android Dev Summit 2018
Here are the key takeaways on why single activity architectures are recommended:
Problem with multiple activities
- Sharing data between activities exposes the data to a much larger scope (application scope) than necessary
Possible solution
- Build the layering within an activity by having multiple destinations (fragments) and share data across the activity scope
Following this advice, I adopted the single activity architecture in my app by having just one* launcher activity acting as the entry point. Once the app has launched, every view within the app is controlled by fragments.
*Technically, I have two activities. The very first activity is a SplashActivity that acts as a splash screen to render background drawable for the duration of the cold boot. This activity immediately creates intent to start the “real” single activity which houses the rest of my views.
Navigation Graph
My app has two levels of navigation graphs. The outer navigation graph handles the flow from the cold boot to authentication fragments: [login, registration and forgot-password]
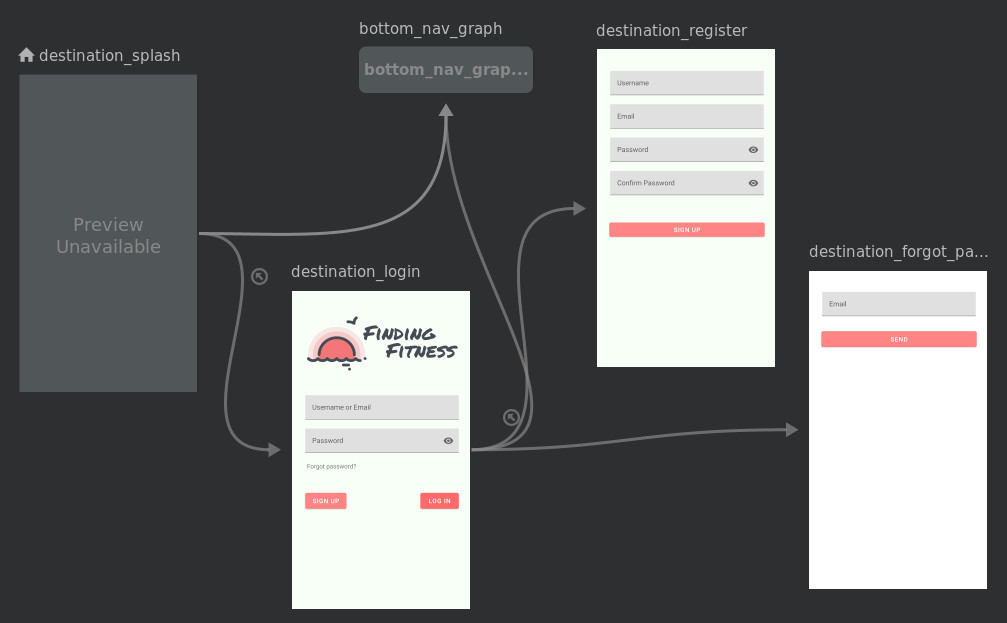
The inner navigation graph handles the post-authentication navigation. This second navigation is implemented with the bottom navigation bar where users can swap between multiple fragments by selecting a menu item on the bar.
Nesting graphs can be achieved by placing the <include> tag under the parent navigation graph. In my graph, I have defined the entry point with app:startDestination property as SplashFragment. This fragment shares the same LoginViewModel as my LoginFragment. I’ll be focusing more on the ViewModels in a separate upcoming post. But for now, you can think of it as a shared scope between the two fragments.
<?xml version="1.0" encoding="utf-8"?>
<navigation xmlns:android="http://schemas.android.com/apk/res/android"
    xmlns:app="http://schemas.android.com/apk/res-auto"
    xmlns:tools="http://schemas.android.com/tools"
    android:id="@+id/nav_graph"
    app:startDestination="@id/destination_splash">
    <include app:graph="@navigation/bottom_nav_graph" />
    <fragment
        android:id="@+id/destination_login"
        android:name="com.leoybkim.findingfitness.login.LoginFragment"
        android:label="LoginFragment"
        tools:layout="@layout/fragment_login">
        <action
            android:id="@+id/action_loginFragment_to_registerFragment"
            app:destination="@+id/destination_register" />
        <action
            android:id="@+id/action_loginFragment_to_forgotPasswordFragment"
            app:destination="@id/forgotPasswordFragment" />
        <action
            android:id="@+id/action_loginFragment_to_bottomNavigation"
            app:popUpTo="@+id/destination_login"
            app:popUpToInclusive="true"
            app:destination="@id/bottom_nav_graph" />
    </fragment>
    <fragment
        android:id="@+id/destination_register"
        android:name="com.leoybkim.findingfitness.register.RegisterFragment"
        android:label="RegisterFragment"
        tools:layout="@layout/fragment_register" />
    <fragment
        android:id="@+id/destination_forgot_password"
        android:name="com.leoybkim.findingfitness.forgotpassword.ForgotPasswordFragment"
        android:label="ForgotPasswordFragment"
        tools:layout="@layout/fragment_forgot_password" />
    <fragment
        android:id="@+id/destination_splash"
        android:name="com.leoybkim.findingfitness.login.SplashFragment"
        android:label="SplashFragment">
        <action
            android:id="@+id/action_splashFragment_to_loginFragment"
            app:destination="@id/destination_login"
            app:popUpTo="@+id/destination_splash"
            app:popUpToInclusive="false" />
        <action
            android:id="@+id/action_splashFragment_to_bottom_nav_graph"
            app:destination="@id/bottom_nav_graph" />
    </fragment>
</navigation>
The SplashFragment will observe the authentication state mutated by the LoginViewModel. If the user is not authenticated, it will navigate them to the LoginFragment. If the user is authenticated, it will navigate them to the nested bottom navigation graph. This child graph also has its own entry point defined with app:startDestination property. So pre-authenticated users will be directed to the ProfileFragment upon launching the app.
<?xml version="1.0" encoding="utf-8"?>
<navigation xmlns:android="http://schemas.android.com/apk/res/android"
    xmlns:app="http://schemas.android.com/apk/res-auto"
    android:id="@+id/bottom_nav_graph"
    app:startDestination="@id/destination_profile">

    <fragment
        android:id="@+id/destination_profile"
        android:name="com.leoybkim.findingfitness.profile.ProfileFragment"
        android:label="@string/profile">
        <action
            android:id="@+id/action_profileFragment_to_loginFragment"
            app:destination="@id/destination_login" />
    </fragment>
    <fragment
        android:id="@+id/destination_achievements"
        android:name="com.leoybkim.findingfitness.fragments.AchievementsFragment"
        android:label="@string/achievements" />
    <fragment
        android:id="@+id/destination_logs"
        android:name="com.leoybkim.findingfitness.fragments.LogsFragment"
        android:label="@string/logs" />
    <fragment
        android:id="@+id/destination_settings"
        android:name="com.leoybkim.findingfitness.settings.SettingsFragment"
        android:label="@string/settings">
        <action
            android:id="@+id/action_settingFragment_to_loginFragment"
            app:destination="@id/destination_login" />
    </fragment>
    <fragment
        android:id="@+id/destination_edit_profile"
        android:name="com.leoybkim.findingfitness.editprofile.EditProfileFragment"
        android:label="@string/edit_profile">
        <action
            android:id="@+id/action_editProfileFragment_to_loginFragment"
            app:destination="@id/destination_login" />
        <action
            android:id="@+id/action_editProfileFragment_to_profileFragment"
            app:destination="@id/destination_profile" />
    </fragment>
</navigation>
Navigating between fragments can be accomplished by providing the NavController with an action ID or a destination ID. Actions are the possible navigation paths defined inside the graph. Destinations are referring to the fragment resource. The Android developer’s guide recommends using the action id where possible because actions can provide additional compile-time safety and offer animations between transitions.
private lateinit var navController: NavController

override fun onCreateView(
    inflater: LayoutInflater,
    container: ViewGroup?,
    savedInstanceState: Bundle?
): View {
    navController = this.findNavController()

    // ...

    navController.navigate(LoginFragmentDirections.actionLoginFragmentToRegisterFragment())
}
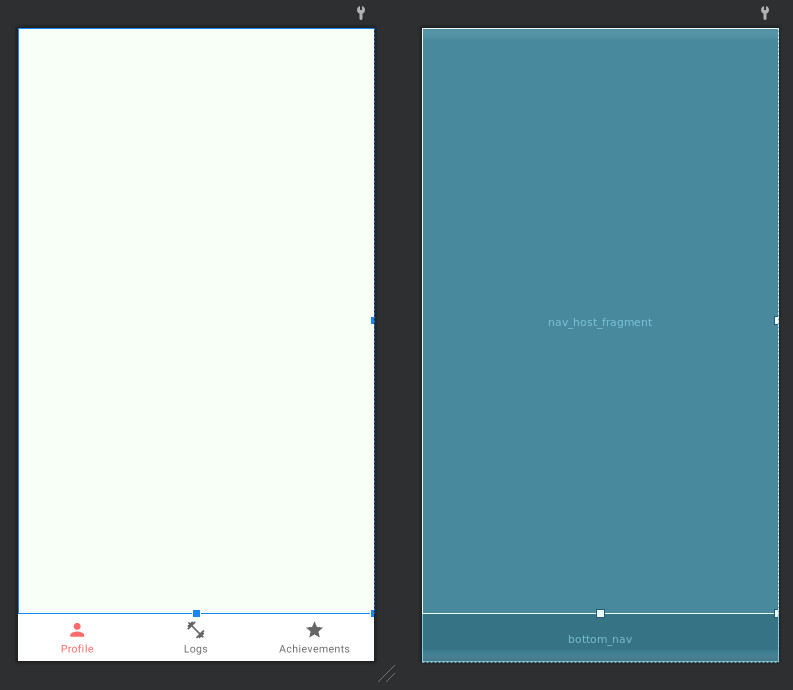
NavHostFragment
There are two views in the layout of my single activity:
-
FragmentContainerView
- NavHostFragment widget that provides an area for self-contained navigation to occur.
-
BottomNavigationView
- Implementation of material design bottom navigation bar which allows users to switch between multiple top-level fragments
<layout xmlns:android="http://schemas.android.com/apk/res/android"
    xmlns:app="http://schemas.android.com/apk/res-auto"
    xmlns:tools="http://schemas.android.com/tools">

    <LinearLayout
        android:layout_width="match_parent"
        android:layout_height="match_parent"
        android:background="@color/colorMintCream"
        android:orientation="vertical"
        tools:context=".FindingFitnessActivity">

        <androidx.fragment.app.FragmentContainerView
            android:id="@+id/nav_host_fragment"
            android:name="androidx.navigation.fragment.NavHostFragment"
            android:layout_width="match_parent"
            android:layout_height="0dp"
            android:layout_weight="1"
            app:defaultNavHost="true"
            app:navGraph="@navigation/nav_graph" />

        <com.google.android.material.bottomnavigation.BottomNavigationView
            android:id="@+id/bottom_nav"
            android:layout_width="match_parent"
            android:layout_height="wrap_content"
            app:menu="@menu/menu_navigation" />

    </LinearLayout>
</layout>
The blank area labeled as the nav_host_fragment is where different views can be swapped in and out whilst the bottom_nav is fixed in position the whole time.
Setting up the bottom navigation can be handled by the NavigationUI class. NavigationUI class is included as part of the navigation component. It can also be used to manage the top app bar and the navigation drawer.
You will need to first define the menu items to be displayed on the bottom navigation bar:
<!-- menu_navigation.xml -->
<?xml version="1.0" encoding="utf-8"?>
<menu xmlns:android="http://schemas.android.com/apk/res/android">
    <item
        android:id="@+id/destination_profile"
        android:icon="@drawable/ic_person_black_24dp"
        android:title="@string/profile" />

    <item
        android:id="@+id/destination_logs"
        android:icon="@drawable/ic_fitness_center_black_24dp"
        android:title="@string/logs" />

    <item
        android:id="@+id/destination_achievements"
        android:icon="@drawable/ic_star_black_24dp"
        android:title="@string/achievements" />
</menu>
Pre-authentication fragments like the login screen and registration screen need to hide the bottom navigation visibility. This can be done by adding the OnDestinationChangedListener to the NavController inside the onCreate of the single activity, and by setting the visibility based on the destination.
private lateinit var binding: ActivityFindingFitnessBinding
private lateinit var navController: NavController

override fun onCreate(savedInstanceState: Bundle?) {
    super.onCreate(savedInstanceState)
    binding = ActivityFindingFitnessBinding.inflate(layoutInflater)
    setContentView(view)
    val navHostFragment =
        supportFragmentManager.findFragmentById(R.id.nav_host_fragment) as NavHostFragment
    navController = navHostFragment.navController


    // Setup bottom navigation
    NavigationUI.setupWithNavController(binding.bottomNav, navController)

    // Setup navigation listener
    navController.addOnDestinationChangedListener { _, destination, _ ->
        when (destination.id) {
            R.id.destination_splash,
            R.id.destination_login,
            R.id.destination_register,
            R.id.destination_forgot_password,
            -> {
                binding.bottomNav.visibility = View.GONE
            }
            else -> {
                binding.bottomNav.visibility = View.VISIBLE
            }
        }
    }
}