Dev Journal #14 - App Architecture Part 1
androidCommon architectural principles
Here are two important architectural principles recommended by the Jetpack guide.
1. Separation of concerns
The first and foremost principle is the separation of concerns. This is a fundamental principle that applies not only to Android but in all other areas of software development as well. The rule is simple; don’t create a giant block of code that handles everything. Try to break up each component into smaller units of code so that individual classes or functions have little to no overlap in their functionality. Organizing your code this way is advantageous in the following ways:
- Easier modification
- Less line of codes need be touched when updating or adding a new feature
- Improve testability
- Smaller modules isolated from other functionalities make test writing easier
- Develops loosely coupled system
- Components that are less dependent on each other can be substituted relatively easily with an alternative implementation.
2. Drive UI from a persistent model
Applications should drive UI from a persistent model. The UI, or more specifically the View objects are nothing more than the representation of models. The term model or domain model generally refers to an abstracted data object and its behaviours built around the business logic of your app. A persistent model allows the data to be preserved even when Android OS destroys the app or when the network connection is lost. Models are independent of the View objects and therefore unaffected by the Android activity lifecycle concerns.
Repository Pattern
In Dev Journal #11 - Model View ViewModel (MVVM), I presented a high-level overview of the MVVM architecture. In this two-part blog series, I’ll be taking a deeper dive into each section of the architecture keeping the aforementioned principles in mind. I want to start with perhaps the most important part of the architecture, the repository. The main goal we are trying to achieve is once again, the separation of concerns. From web services to the local database, data can come from many different places in an app. Nonetheless, the app UI should not need to be concerned about the source of the data. That is the job of the repository to appropriately retrieve the data across different sources and present them to the UI layer as the single source of truth
In information systems design and theory, single source of truth (SSOT) is the practice of structuring information models and associated data schema such that every data element is mastered (or edited) in only one place. - Wikipedia
Persisting Data
To reduce bandwidth from redundant web requests and support offline usage, we might want to cache some of the data fetched from network calls or the ones provided by the user. However, different REST API endpoints can sometimes provide overlapping information, and the app might display inconsistent data because the cache might be out of sync. One solution is to use the Room persistence library along with LiveData or Flow.
Room adds an abstraction layer over the Android’s built-in SQLite database. There are three components needed to persist data through the Room library:
- Data entities that map to the tables in the database
- Data access objects (DAO) that provide methods to query, update, insert, and delete data in the database
- Database class that holds the database and serves as the main access point for the underlying connection
Include the following dependencies to the app module to start using the Room library:
implementation "androidx.room:room-runtime:2.3.0"
implementation "androidx.room:room-ktx:2.3.0"
kapt "androidx.room:room-compiler:2.3.0"
So far, there is only one entity in my app, UserProfile. So I’ll be using this as my example to show how to implement the three steps listed above.
1. Data Entity
First, start by creating a data entity that maps to the user profile table in the database. There are no extra steps required for you to create the table beforehand. Annotating this data entity with @Entity will create the corresponding table with columns for each field that’s defined in the entity marked with @ColumnInfo. Each entity must have at least one field annotated with @PrimaryKey.
@JsonClass(generateAdapter = true)
@Entity(tableName = "user_profile")
data class UserProfile(
    @PrimaryKey
    @ColumnInfo(name = "username")
    val username: String,

    @ColumnInfo(name = "auth_token")
    @field:Json(name = "auth_token") val authToken: String? = null,

    @ColumnInfo(name = "email")
    var email: String? = null,

    @ColumnInfo(name = "bio")
    var bio: String? = null,

    @ColumnInfo(name = "first_name")
    @field:Json(name = "first_name") var firstName: String? = null,

    @ColumnInfo(name = "last_name")
    @field:Json(name = "last_name") var lastName: String? = null,

    @ColumnInfo(name = "image")
    var image: String? = null
)
2. DAO
Second, create a data access object (DAO) interface. DAO allows the client to interact with the database through:
- Convenience methods
- Query method
Convenience method annotations include @Insert, @Update and @Delete. These methods accept data entity instances as parameters. The @Query annotation allows you to write SQL statements and expose them as DAO methods. You can use these query methods to query data from the database or perform more complex inserts, updates and deletes.
By default, all queries must be executed on a separate thread. The Room library has Kotlin coroutines support which allows the queries to be called from a coroutine or another suspension function when methods are modified with the suspend keyword. Using Flow or LiveData as return value type allows you to create observable queries which emit new values whenever there are changes to any of the tables that are referenced by the query.
@Dao
interface UserProfileDao {
    @Insert(onConflict = OnConflictStrategy.REPLACE)
    suspend fun insert(userProfile: UserProfile)

    @Update
    suspend fun update(userProfile: UserProfile)

    @Query("SELECT * FROM user_profile WHERE username = :username")
    fun load(username: String): Flow<UserProfile>

    @Query("DELETE FROM user_profile")
    suspend fun clear()
}
3. Room Database
Last but not least, the code snippet below is an implementation of the final step which I’ve taken from the Google Codelab: Android Room with a View - Kotlin. This database class is an abstract class that extends the RoomDatabase class. It is annotated with @Database with entities that belong in the database declared inside the annotation parameters.
@Database(entities = [UserProfile::class], version = 1, exportSchema = false)
abstract class FindingFitnessDatabase : RoomDatabase() {
    abstract val userProfileDao: UserProfileDao
    companion object {
        @Volatile
        private var INSTANCE: FindingFitnessDatabase? = null
        fun getInstance(context: Context): FindingFitnessDatabase {
            synchronized(this) {
                var instance = INSTANCE
                if (instance == null) {
                    instance = Room.databaseBuilder(
                        context.applicationContext,
                        FindingFitnessDatabase::class.java,
                        "finding_fitness_database"
                    )
                        .fallbackToDestructiveMigration()
                        .build()
                    INSTANCE = instance
                }
                return instance
            }
        }
    }
}
The class has a private variable INSTANCE and a public function getInstance() declared under the companion object. If you are coming from a Java background like me, it might be your first time seeing the keyword companion object. Companion objects are singleton objects tied to the class that you can access without an instance of the class. They are similar to the keyword static in Java where the objects can be called by using the class name as the qualifier. For example, clients can call FindingFitnessDatabase.getInstance(context) to instantiate a new FindingFitnessDatabase.
The variable INSTANCE will keep a reference to any database returned by getInstance(). Checking the value of this variable ahead will help us avoid repeatedly initializing the database. The variable annotated with @Volatile will never be cached, and all writes and reads will be done to and from the main memory. This means that data changes made on one thread will be visible to other threads. Although this keyword will guarantee the atomicity of the field, it is not thread-safe until we use the synchronized() function. Because multiple threads can ask for the database at the same time, we need to ensure we only initialize it within the synchronized block which only allows one thread to enter at a time.
Finally, when the database version on the device does not match the latest schema version, Room runs necessary migrations on the database.
If it cannot find the set of migrations that will bring the database to the current version, it will throw an IllegalStateException.
You can call fallbackToDestructiveMigration() method to change this behaviour to recreate the database instead of crashing.
Resource loading decision tree
As mentioned earlier, the repository implements the logic for deciding whether to fetch the data from the network or query the local database for cached results. The decision tree diagram below illustrates this logical flow. The first step is to query the database for the resource. It will then decide if the information needs to be fetched again from the network. Once the network call returns, it will upsert the response into the database or handle the exception if it catches an error.
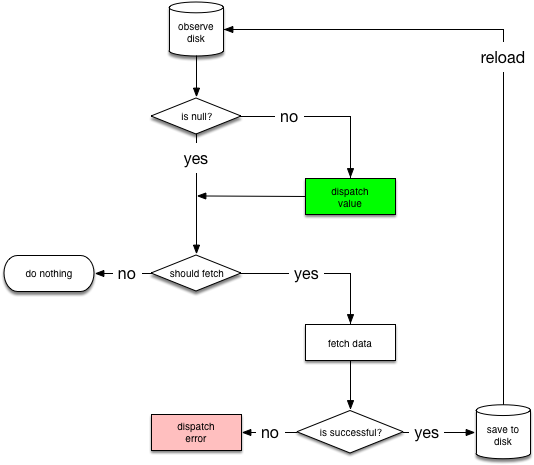
source: https://developer.android.com/jetpack/guide#addendum
Below is the Kotlin implementation of this decision tree. Notice the modifier inline in front of the function. networkBoundResource() is a higher-order function, meaning it is a function that takes other functions as parameters or returns a function. Each higher-order function is an object and captures a closure, both of which introduce runtime overhead. Since networkBoundResource function will be used quite frequently, using the modifier inline will help save some extra object allocations by inlining the lambda expressions. The inline modifier will inline both the function itself and the lambdas passed to it into the call site. It’s important to also note that the networkBoundResource function calls the lambda passed as parameters from flow builder which is another execution context. In such cases, non-local control flow is not allowed in the lambdas. So to indicate this, the lambda parameter is marked with the crossinline modifier.
inline fun <ResultType, RequestType> networkBoundResource(
    crossinline fetch: suspend () -> Flow<ApiResponse<RequestType>>,
    crossinline onFetchFailed: () -> Unit,
    crossinline query: () -> Flow<ResultType>,
    crossinline saveFetchResult: suspend (RequestType) -> Unit,
    crossinline shouldFetch: (ResultType) -> Boolean = { true }
) = flow {
    val data = query().first()
    if (shouldFetch(data)) {
        emit(Resource.loading(data))
        fetch().collect { response ->
            when (response) {
                is ApiSuccessResponse -> {
                    saveFetchResult(response.body)
                    emitAll(query().map { Resource.success(it, response.headers) })
                }
                is ApiEmptyResponse -> {
                    emitAll(query().map { Resource.success(it, response.headers) })
                }
                is ApiErrorResponse -> {
                    onFetchFailed()
                    emitAll(query().map { Resource.error(response.errorMessage, it) })
                }
                is ApiUnauthorizedResponse -> {
                    onFetchFailed()
                    emitAll(query().map { Resource.unauthorized(response.errorMessage, it) })
                }
            }
        }
    } else {
        emitAll(query().map { Resource.success(it, null) })
    }
}
Network calls
We now know when to fire the network calls based on the decision tree above. But how do we exactly make the network call, and how do we formulate the returned response into the object types we want? Thanks to the developers at Square, we already have the tools to solve these problems. We will be using one of our favourite HTTP client libraries for Android: Retrofit and the JSON parser library: Moshi. You will need to include the following dependencies in the module build file.
implementation "com.squareup.retrofit2:retrofit:2.9.0"
implementation "com.squareup.retrofit2:converter-moshi:2.9.0"
implementation "com.jakewharton.retrofit:retrofit2-kotlin-coroutines-adapter:0.9.2"

implementation "com.squareup.moshi:moshi:1.12.0"
implementation "com.squareup.moshi:moshi-kotlin:1.12.0"
implementation "com.squareup.moshi:moshi-adapters:1.12.0"
kapt "com.squareup.moshi:moshi-kotlin-codegen:1.12.0" // required for codegen
At the core of the Retrofit library is another library called OkHttp library. Basically, OkHttp serves as the HTTP client while the Retrofit wrapper provides a convenient API declaration interface and type-safety of response and request objects. Retrofit instance follows a builder pattern where you can chain each configuration one by one.
private val okHttpClient = OkHttpClient()
    .newBuilder()
    .addInterceptor(NetworkConnectionInterceptor(application))
    .build()

private val retrofit = Retrofit.Builder()
    .baseUrl(BASE_URL)
    .client(okHttpClient)
    .addCallAdapterFactory(FlowCallAdapterFactory())
    .addConverterFactory(MoshiConverterFactory.create())
    .build()
First, I point the base URL to where the server is running. Then I set my HTTP client as the OkHttpClient instance initialized with a custom network interceptor.
class NetworkConnectionInterceptor(
    context: Context
) : Interceptor {

    private val appContext: Context = context.applicationContext

    override fun intercept(chain: Interceptor.Chain): Response {
        if (hasNetworkConnection()) {
            return chain.proceed(chain.request())
        } else {
            throw NoNetworkConnectionException()
        }
    }

    private fun hasNetworkConnection(): Boolean {
        // check network connection
    }
}
This interceptor checks if the device has network connection availability before sending web requests. If the device is offline, the interceptor will throw an exception anytime a network request is about to be made.
Next in the builder chain is the call adapter factory for supporting service method return types other than the default Call object. Lastly, the converter factory is added for the serialization and deserialization of objects. OkHttp alone can only handle RequestBody and ResponseBody objects but Retrofit can safely serialize these types into other types with the help of serialization a library such as Moshi. I’ll be covering both of these steps in more detail in the sections below (Custom call adapter and Moshi).
After building the Retrofit instance, you can create an implementation of the API endpoint defined by the service interface. Initialization by lazy { ... } is thread-safe and guarantees that the initializer is invoked only once. It also will be not be initialized until it is called to be used.
class NetworkService(private val application: Application) {
    // Retrofit builder ...

    val userProfileAPI: UserProfileService by lazy {
        retrofit.create(UserProfileService::class.java)
    }
}
The service interface lists all the possible endpoints that the client can request from my Django REST server. Retrofit enables developers to easily annotate API endpoints with request methods and dynamically update request URLs with @Path variables.
interface UserProfileService {
    @GET("/api/user/{username}/profile/")
    fun getUserProfile(
        @Path("username") username: String
    ): Flow<ApiResponse<UserProfile>>

    @PUT("/api/user/{username}/profile/")
    fun updateUserProfile(
        @Path("username") username: String,
        @Body userProfile: UserProfile
    ): Flow<ApiResponse<UserProfile>>
}
Network response
You will notice that I’m expecting a generic type Flow<ApiResponse<T>> to be returned from each API endpoint defined above. I’ll cover how to transform the network response into a Flow<ApiResponse<T>> object using the CallAdapter in the next section. In the current step, we’ll define the custom API response class APIResponse<T> to handle the callback status.
Begin by creating a sealed class that represents the different types of response states. Sealed classes restrict class hierarchies. All subclasses of a sealed class are known at compile-time and no other subclasses may appear after a module with the sealed class is compiled.
The key benefit of using sealed classes comes into play when you use them in a
whenexpression. If it’s possible to verify that the statement covers all cases, you don’t need to add an else clause to the statement. - Kotlin Documentation
sealed class ApiResponse<T> {
    companion object {
        fun <T> create(error: Throwable): ApiErrorResponse<T> {
            return if (error is NoNetworkConnectionException) {
                ApiErrorResponse("Please check your network connection", 400)
            } else {
                ApiErrorResponse(error.message ?: "unknown error", 500)
            }
        }

        fun <T> create(response: Response<T>): ApiResponse<T> {
            return if (response.isSuccessful) {
                val body = response.body()
                if (body == null || response.code() == 204) {
                    ApiEmptyResponse(headers = response.headers())
                } else {
                    ApiSuccessResponse(
                        body = body,
                        headers = response.headers()
                    )
                }
            } else {
                val code = response.code()
                if (code == 401) {
                    ApiUnauthorizedResponse(response.message())
                } else {
                    val msg = response.errorBody()?.string()
                    val errorMsg = if (msg.isNullOrEmpty()) {
                        response.message()
                    } else {
                        msg
                    }
                    ApiErrorResponse(errorMsg ?: "unknown error", response.code())
                }
            }
        }
    }
}

data class ApiEmptyResponse<T>(val headers: Headers) : ApiResponse<T>()
data class ApiUnauthorizedResponse<T>(val errorMessage: String) : ApiResponse<T>()
data class ApiSuccessResponse<T>(val body: T, val headers: Headers) : ApiResponse<T>()
data class ApiErrorResponse<T>(val errorMessage: String, val code: Int) : ApiResponse<T>()
The only minor problem I have with the above implementation is how I’m handling the network connection exception. Technically, that is not an API response because the issue occurred from the client side. For now, I’ve grouped it up with other error responses because it is easier for UI to consume it that way. However, I may need to refactor this in the future if want to handle the exception in more detail.
Custom call adapter
Earlier, I mentioned the use of the call adaptor factory in the Retrofit builder chain. This adaptor factory is used to transform the original Retrofit’s Call object into custom object types when we receive the response from a network call. In my case, I’ll be transforming them into a Flow<ApiResponse<T>> object. I can do this by implementing Retrofit’s CallAdapter interface like the following:
class FlowCallAdapter<R>(
    private val responseType: Type
) : CallAdapter<R, Flow<ApiResponse<R>>> {

    override fun responseType() = responseType

    override fun adapt(call: Call<R>): Flow<ApiResponse<R>> = flow {
        val response = call.awaitResponse()
        emit(ApiResponse.create(response))

    }.catch { error ->
        emit(ApiResponse.create(error))
        error.printStackTrace()
    }
}
The instance of the FlowCallAdapter is created by the factory class FlowCallAdapterFactory which then is installed into the Retrofit instance as we have seen from the code snippet earlier.
class FlowCallAdapterFactory : CallAdapter.Factory() {
    override fun get(
        returnType: Type,
        annotations: Array<Annotation>,
        retrofit: Retrofit
    ): CallAdapter<*, *>? {
        if (getRawType(returnType) != Flow::class.java) {
            return null
        }
        val observableType = getParameterUpperBound(0, returnType as ParameterizedType)
        val rawObservableType = getRawType(observableType)
        require(observableType is ParameterizedType) { "resource must be parameterized" }
        require(rawObservableType == ApiResponse::class.java) { "type must be a resource" }
        val bodyType = getParameterUpperBound(0, observableType)
        return FlowCallAdapter<Any>(bodyType)
    }
}
Moshi
Moshi makes it easy to parse JSON into Kotlin objects. You can use Moshi through reflection, codegen or both. Reflection inspects classes during runtime, whereas codegen generates necessary code at compile-time. Thus, the usual trade-off between the two options is that the reflection has a faster compile-time but a slower runtime, and codegen is vice versa.
Codegen
All data classes must be annotated with @JsonClass(generateAdapter = true) as shown in the previous section Data Entity. This generates the ${EntityName}JsonAdapter.kt at compile-time.
Reflection
No annotations are required on the entities. However, Retrofit instance needs to be configured with the Moshi’s KotlinJsonAdapterFactory.
private val moshi = Moshi.Builder()
    .add(KotlinJsonAdapterFactory())
    .build()

private val retrofit = Retrofit.Builder()
    .client(okHttpClient)
    .addCallAdapterFactory(FlowCallAdapterFactory())
    .addConverterFactory(MoshiConverterFactory.create(moshi))
    .addConverterFactory(MoshiConverterFactory.create())
    .baseUrl(BASE_URL)
    .build()
Network status
Being able to keep track of the network state along with the data might be useful information that can be relayed to the UI. For instance, you may want to show a spinner while data is loading and then update the data when the network state returns a successful response. The Resource class can be used to encapsulates both data and the network state. I also added message and headers property to access them in special circumstances like displaying error messages and parsing out CSRF tokens.
enum class APIStatus { SUCCESS, ERROR, LOADING, UNAUTHORIZED }

data class Resource<out T>(
    val status: APIStatus,
    val data: T?,
    val message: String?,
    val headers: Headers?
) {
    companion object {
        fun <T> success(data: T?, headers: Headers?): Resource<T> {
            return Resource(APIStatus.SUCCESS, data, null, headers)
        }

        fun <T> error(msg: String, data: T?): Resource<T> {
            return Resource(APIStatus.ERROR, data, msg, null)
        }

        fun <T> unauthorized(msg: String, data: T?): Resource<T> {
            return Resource(APIStatus.UNAUTHORIZED, data, msg, null)
        }

        fun <T> loading(data: T?): Resource<T> {
            return Resource(APIStatus.LOADING, data, null, null)
        }
    }
}
Repository
The last step is building the mediator module that provides a clean API for the rest of the app. This is the central repository that can provide the single source of truth to the UI layer. The networkBoundResource() function can handle the parameter passed from the UI to indicate whether the source of the data should come from a locally cached resource or a real-time data fetched from the web service.
class UserProfileRepository(
    private val userProfileDao: UserProfileDao,
    private val networkService: NetworkService
) {

    // ...

    private val rateLimiter = RateLimiter<String>(10, TimeUnit.MINUTES)


    fun getUserProfile(username: String, refresh: Boolean): Flow<Resource<UserProfile>> =
        networkBoundResource(
            fetch = {
                networkService.userProfileService.getUserProfile(
                    authToken,
                    username
                )
            },
            onFetchFailed = {
                rateLimiter.reset("getUserProfile")
            },
            query = { userProfileDao.load(username) },
            saveFetchResult = { it ->
                userProfileDao.update(it)
            },
            shouldFetch = {
                refresh || rateLimiter.shouldFetch("getCurrentUserProfile")
            }
        ).flowOn(Dispatchers.IO)

    // ...
}
Additionally, you can implement a rate limiter to debounce the number of network calls made. Perhaps it makes sense to only fetch the data after a certain cooldown period because you know that the particular data does not update frequently or does not hugely impact the user experience even if the user is notified of the update with a bit of a delay. Conversely, you can also set it up so that you never request real-time data unless a certain period has passed, only which then you do want to refresh the cache on the next request. Here is an implementation that I have learned from Google’s sample project named GithubBrowserSample.
class RateLimiter<in KEY>(timeout: Int, timeUnit: TimeUnit) {
    private val timestamps = ArrayMap<KEY, Long>()
    private val timeout = timeUnit.toMillis(timeout.toLong())

    @Synchronized
    fun shouldFetch(key: KEY): Boolean {
        val lastFetched = timestamps[key]
        val now = now()
        if (lastFetched == null) {
            timestamps[key] = now
            return true
        }
        if (now - lastFetched > timeout) {
            timestamps[key] = now
            return true
        }
        return false
    }

    private fun now() = SystemClock.uptimeMillis()

    @Synchronized
    fun reset(key: KEY) {
        timestamps.remove(key)
    }
}
The RateLimiter class instantiates a key-value map that keeps track of the last time a specific fetch was made. The key can be something unique like the name of the API or the function. The first network call will insert a key with the timestamp of the moment the request was sent. Next time when the same network call is requested, it will look up the key against this array to see if the request is still in the timeout phase or not. The methods annotated with @Synchronized will be protected from concurrent execution by multiple threads by the monitor of the instance.
Interestingly, I have discovered a bug while testing the rate limiter. I noticed that the network calls are not adhering to my timeout rules when they are called from different ViewModels. This is because the UserRepository is not a singleton object in this current setup. So anytime a new instance of UserRepository is created, it will also create a new instance of the RateLimiter class. This means that this new instance no longer has reference to the keys I’ve inserted to the other instances. I’ve since then updated my repository to be a @Singleton with Hilt (codegen library for Dagger) to resolve this bug. I’m planning to write up on how I added this dependency injection with Hilt in the upcoming posts.
Conclusion
In this post, we checked out the two important architectural principles: 1) Separation of concerns and 2) Drive UI from a persistent model. We also took a closer look at designing the repository of the Model in the Model-View-ViewModel architecture. We covered how to fetch data from a remote data source using the Retrofit library for making a network call. We also covered how to fetch data from a local data source using the Room library for querying the SQLite database. Finally, we learned how to persist these data in the Room database as well as providing a mediator module to access these data from the rest of the app. In Part 2 of the App Architecture post, I’ll be going over the ViewModel and the View part of the MVVM architecture.